
Start with a pair of flat plastic putty knives (35 cents at the hardware store). Use a pair of heavy duty shears to cut one to the same curve as a nickel. Smooth the cut edge to get rid of any snags and irregularities. A razor blade and sandpaper work fine for this.
The rounded tool is used to force the putty into the gap between the panels and to create a fillet of the correct size. As the angle between panels changes, so does the fillet's thickness.
Dragging the rounded knife leaves a ridge on each side of the fillet. The flat knife is used to clean this up. The result is as clean as if masking tape was used.

All the wires are out, leaving flat tacks in the gaps, ready to be filled and covered with the fillets. Note how the tacks hold the boat together securely, even with the extreme bends.
The stem piece is also visible in the bow.

Covering the outside of the seams with packing tape keeps the fillet material from dripping out onto the floor.
Unfortunately, it's darn near impossible to fillet, seam and photograph all at once. As a result, I have no pictures of the actual process, which is this:
1. Paint the seam with some unthickened epoxy, especially the edges. This seals the end grain and prevents epoxy starvation.
2. Grab a glob of putty with the rounded knife and slap it into one end of the seam. Drag the rounded knife through the glob, pressing hard enough to scrape the wood on both sides of the fillet.
3. Use the flat knife to scrape the putty ridges that the round knife made. These scrapings are the starting glob for the next part of the seam. Repeat 2 & 3 until the seam is done.
4. Lightly paint the completed seam with unthickened epoxy. This leaves it as smooth as a baby's bottom.
5. While the seam is firming up a bit, take the glass tape and saturate it with epoxy. Roll it up, take it to the boat and unroll it along the seam. Use a gloved hand to smooth it into place. Use a gloved hand to squeegee the excess epoxy from the tape onto the hull.

This is the end result. The fillet has been applied, the tape glued down and the selvedge scraped. Note how thin the fillet is. It doesn't even come to the stitch holes, yet the glass tape is smooth with no voids. This is a result of removing the wires and using the right tools. Note also the texture of the tape. This indicates just enough epoxy to completely wet the tape, yielding maximum strength with minimum weight.
This type of seam minimizes the weight of the boat and the consumption of epoxy and woodflour While many builders run out of both, I actually had a large surplus of woodflour at the end of the project. I would have also had a sizeable epoxy surplus, except that I applied more glass than was called for in the instructions. More on that later.
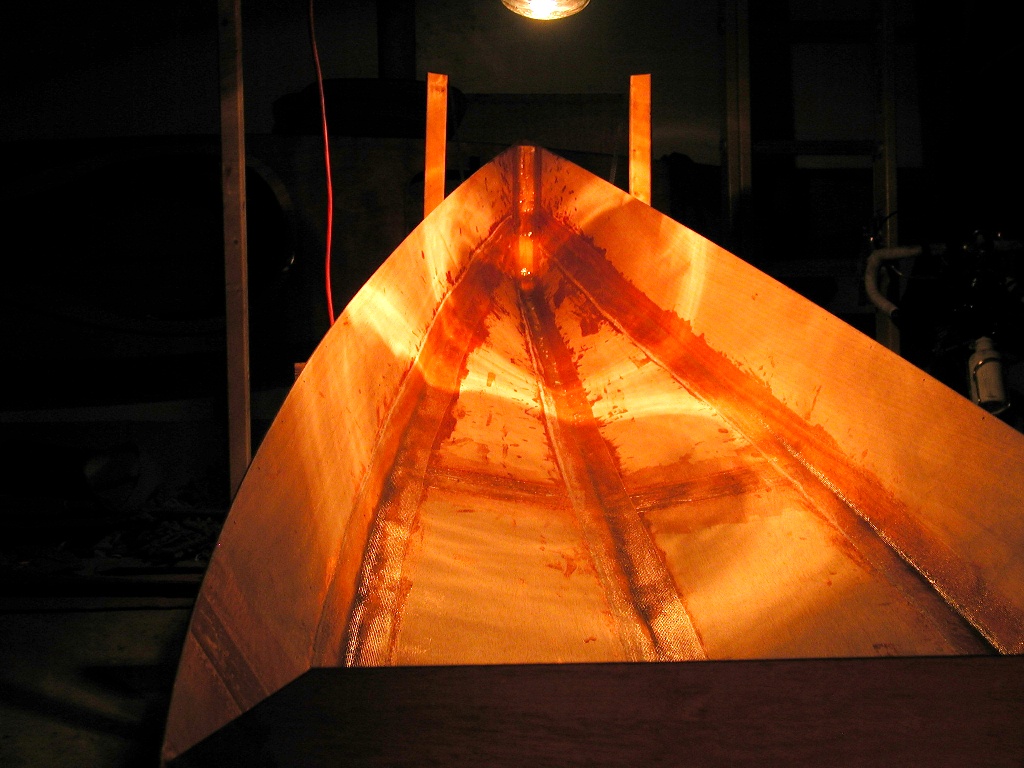
The inside of the hull is completely taped and the boat rests under the heat lamps for 24 hours while the epoxy cures (the joys of winter builds). This view is toward the bow. The cockpit bulkhead is visible in silhouette in the forground.

Yet another deviation from CLC's instructions. This time it's to completely glass the Duck's interior. I did this to make my boat a true composite construction. As specified by CLC, it's simply a glass-covered monocoque wooden boat with composite seams and a composite cockpit floor panel. Glassing the inside made it into a 100% composite boat. The advantage is much greater strength and durability. The hull and deck are stiffer, resulting in less flexing and fatigue. This is the same reason that I taped the bulkhead joints on both sides, even though not called for by the manual.
The disadvantages to doing this are increased labor, increased weight and increased epoxy consumption. This is where the savings from doing thin fillets and substituting end pieces for end pours come into their own. I also figured that I'd be able to do a good enough job of glassing to control these factors. In fact, the weight ended up at 39 lbs, 1 lb less than specified, and I only had to buy 1 refill for the epoxy.
The lights are there to warm the hull & glass before wetting out. The bulkhead was also covered on both sides. The stem and stern were covered with fabric pieced together from scraps.

The finished product, before the bulkhead received its glass. If I had it to do over again, I would glass both sides of the bulkhead before wiring it in place. At this point, the hull was very solid. No more worries about handling it too roughly.